
Whitby Inspired 3D Design Wall Panel
During my designing days, a client with a love for British shores asked for a customised wall panel. I made her three.
My client requested a textured, abstract panel that would be hung in her apartment in Whitby, a town on the coast of England. After a research period and meetings to discuss colours, materials and "feelings", I sent a few pencil sketches to illustrate the concept. My personal favourite was a 3-piece sky and sun design.
The client approved of this design. Wohoo! We both agreed that its main quality was how it "felt" - I believe art inevitably creates a feeling which can either carry a message or enhance an emotion. But, enough of that. Here's how I made it.
The client's specifications included intricate embroidery and beadwork, and having seen my other silk art (I'm a textile designer), requested for a silk painting. In the academic world, we call this 3D Surface Design.
Translated in English, this means while the main material of the wall panels will be fabric, namely, silk, I was to embellish it with metal, non-fabric materials, glass beads, metallic threads, plastic and whatever else was inspired by the ocean, sea, sun rays and sea life.
How I made it...
Note: Raw, unedited photos, therefore excuse the faded shots. Colours haven't shown up too well. Blasted camera.
 Stage 1: Silk fabric for painting measuring 2 x 3 metres is pulled taut over a frame and taped down to secure. Note to self, making a DIY silk painting frame at home with splintered wood, not a hot idea. B*gger!
Clear wax and gutta created the free flowing outlines for the 'waves' of this design. I'm better unrestricted which is why I'm able to draw freehand without templates, ma-sha-Allah.
Jars of blue ink shades were mixed and tested before painting to check consistency. For a wall panel this size, it would be pretty daft to run out of a colour halfway through (I tend to do that). The inks bled into other spaces in one or two spots but the overall effect of blues was not affected, alhamdulillah.
 Stage 2: A yellow 'sun' is ringed with orange and yellow and allowed to dry before applying a new colour, to prevent mixing with the blue. This 'sun' is the first layer, therefore small mistakes can be overlooked.
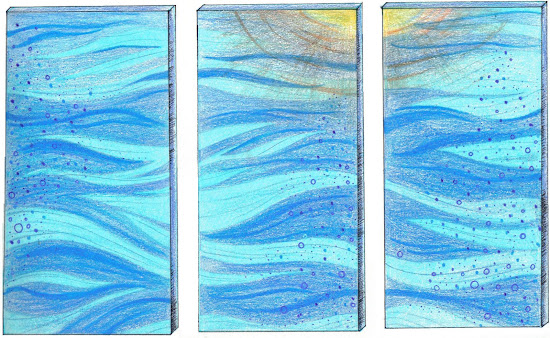
Stage 3: The finished silk painting (above) is shown with the salt technique. This is created by sprinkling sea salt onto freshly painted area which pulls colour away for a speckled effect. Kitchen salt works well too!

Nearly-finished, the completed silk painting is embroidered and cut into 3, ready for hand beadwork.
Stage 4: Silk is flimsy and needs support if it's meant for sewing and decorating. After painting it completely, I backed the silk with iron-on vilene, a resourceful material that can be ripped away or kept as backing, after the sewing is done. As I'm a monster with a sewing machine, I rolled up the whole 2 metre panel and stitched freehand from one length to the other. Metallic threads, gold, silver and blue, were sewn in curves and thicker rows to double up the blue painted waves.
Stage 5: Along with that, home made white/yellow/gold felt was cut into cloud shapes and sewn in appropriate places. Felt is fantastic and makes up a great part of our clothing - scarves, hats, jackets. Handmade felt is better quality than shop-bought; you're in control of what colours are used, its density and the final look. I also incorporated tufts of metallic fibres, angelina threads which fuse together like plastic when heat is applied, and strips of organza and sheer fabrics. This makes 3-4 layers of 'things to look at'.

Stage 6: Pots of glass, pearl and metal beads have been chosen to highlight aspects of the panel. These round balls will also represent oxygen bubbles from the deep seas. Plus, they just look smashing from afar. Each bead is hand stitched twice to prevent loose threads and falling. I hate shoddy chain stitching where if one thread comes out, the whole thing falls to pieces.

Rows of blue beads add a nifty border to the fluffy felt 'clouds'. Drop beads and pear shaped beads make the whole surrounded shape appear to float.

And over silk fibres I stitch pearl white and clear glass beads to create a more ethereal effect. The final result is elegant and contemplative.

Hanging pearl beads are used sparingly and selectively to underline organza and netting shapes. They add motion to the panel and another dimension.

Stage 7: Finally, in the bead department, I used heavier beaded pebbles, sequins and Japanese beads to fill in spaces near the bottom of each panel. This creates a better flow of the design, from feeling a 'seabed' to seeing a sparkling sun.
 Stage 8: Talking of sparkle, the orange ball at the top is fused with fibres, metallic threads and soluble film. Soluble film is a smart-tech fabric in part, allowing you to stitch detailed and dense patterns on its stiff plastic, then dissolve the film under warm water. The leftover stitching is your detail that can be used as applique, motifs, brooches, logos etc. This film also strengthens material, in this case, silk and metallic fibres - otherwise they would not have 'stuck' together. All of the above is stitched onto the sun in circular motions.
Stage 9: Each silk piece, finished with hours of embroidery, felt, beads and fibres, is backed again with stronger vilene before tacking to a light-weight balsa wood board. Each board is pre-fixed with a fastening or hanging function and is ready to hang pretty by the seaside.
The finished panel

My stoopid camera has an extraordinary flash - this looks like it's been bleached. *Back to Photoshop* But ta-da, *jazz hands*. That's one job done. Alhamdulillah.
My client requested a textured, abstract panel that would be hung in her apartment in Whitby, a town on the coast of England. After a research period and meetings to discuss colours, materials and "feelings", I sent a few pencil sketches to illustrate the concept. My personal favourite was a 3-piece sky and sun design.
The client approved of this design. Wohoo! We both agreed that its main quality was how it "felt" - I believe art inevitably creates a feeling which can either carry a message or enhance an emotion. But, enough of that. Here's how I made it.
The client's specifications included intricate embroidery and beadwork, and having seen my other silk art (I'm a textile designer), requested for a silk painting. In the academic world, we call this 3D Surface Design.
Translated in English, this means while the main material of the wall panels will be fabric, namely, silk, I was to embellish it with metal, non-fabric materials, glass beads, metallic threads, plastic and whatever else was inspired by the ocean, sea, sun rays and sea life.
How I made it...
Note: Raw, unedited photos, therefore excuse the faded shots. Colours haven't shown up too well. Blasted camera.

Clear wax and gutta created the free flowing outlines for the 'waves' of this design. I'm better unrestricted which is why I'm able to draw freehand without templates, ma-sha-Allah.
Jars of blue ink shades were mixed and tested before painting to check consistency. For a wall panel this size, it would be pretty daft to run out of a colour halfway through (I tend to do that). The inks bled into other spaces in one or two spots but the overall effect of blues was not affected, alhamdulillah.

Stage 3: The finished silk painting (above) is shown with the salt technique. This is created by sprinkling sea salt onto freshly painted area which pulls colour away for a speckled effect. Kitchen salt works well too!
Nearly-finished, the completed silk painting is embroidered and cut into 3, ready for hand beadwork.
Stage 4: Silk is flimsy and needs support if it's meant for sewing and decorating. After painting it completely, I backed the silk with iron-on vilene, a resourceful material that can be ripped away or kept as backing, after the sewing is done. As I'm a monster with a sewing machine, I rolled up the whole 2 metre panel and stitched freehand from one length to the other. Metallic threads, gold, silver and blue, were sewn in curves and thicker rows to double up the blue painted waves.
Stage 5: Along with that, home made white/yellow/gold felt was cut into cloud shapes and sewn in appropriate places. Felt is fantastic and makes up a great part of our clothing - scarves, hats, jackets. Handmade felt is better quality than shop-bought; you're in control of what colours are used, its density and the final look. I also incorporated tufts of metallic fibres, angelina threads which fuse together like plastic when heat is applied, and strips of organza and sheer fabrics. This makes 3-4 layers of 'things to look at'.

Stage 6: Pots of glass, pearl and metal beads have been chosen to highlight aspects of the panel. These round balls will also represent oxygen bubbles from the deep seas. Plus, they just look smashing from afar. Each bead is hand stitched twice to prevent loose threads and falling. I hate shoddy chain stitching where if one thread comes out, the whole thing falls to pieces.

Rows of blue beads add a nifty border to the fluffy felt 'clouds'. Drop beads and pear shaped beads make the whole surrounded shape appear to float.

And over silk fibres I stitch pearl white and clear glass beads to create a more ethereal effect. The final result is elegant and contemplative.

Hanging pearl beads are used sparingly and selectively to underline organza and netting shapes. They add motion to the panel and another dimension.

Stage 7: Finally, in the bead department, I used heavier beaded pebbles, sequins and Japanese beads to fill in spaces near the bottom of each panel. This creates a better flow of the design, from feeling a 'seabed' to seeing a sparkling sun.
 Stage 8: Talking of sparkle, the orange ball at the top is fused with fibres, metallic threads and soluble film. Soluble film is a smart-tech fabric in part, allowing you to stitch detailed and dense patterns on its stiff plastic, then dissolve the film under warm water. The leftover stitching is your detail that can be used as applique, motifs, brooches, logos etc. This film also strengthens material, in this case, silk and metallic fibres - otherwise they would not have 'stuck' together. All of the above is stitched onto the sun in circular motions.
Stage 9: Each silk piece, finished with hours of embroidery, felt, beads and fibres, is backed again with stronger vilene before tacking to a light-weight balsa wood board. Each board is pre-fixed with a fastening or hanging function and is ready to hang pretty by the seaside.
The finished panel
My stoopid camera has an extraordinary flash - this looks like it's been bleached. *Back to Photoshop* But ta-da, *jazz hands*. That's one job done. Alhamdulillah.


WOW! :D
ReplyDelete